Contributing
This file describes a path to contribute to this project. Check out our CODE OF CONDUCT.
Bug Reports and Feature Requests
If you have encountered a problem with QDarkStyle or have an idea for a new feature, please submit it to the issue tracker.
Contributing to QDarkStyle
The recommended way for new contributors to submit code to QDarkStyle is to fork the repository on GitHub and then submit a pull request after committing the changes. The pull request will then need to be approved by one of the maintainers before it is merged into the main repository.
- Check for open issues or open a fresh issue to start a discussion around a feature idea or a bug.
- Fork the repository on GitHub to start making your changes to the develop branch.
- Write a test that shows that the bug was fixed or that the feature works as expected, or create a screenshot if you are changing the stylesheet evidencing the changes.
- Send a pull request and bug the maintainer until it gets merged and published. Make sure to add yourself to AUTHORS and the change(s) to CHANGES.
Getting Started
These are the basic steps needed to start developing on QDarkStyle.
Create an account on GitHub
Fork the main QDarkStyle repository using the GitHub interface.
Clone the forked repository to your machine
git clone https://github.com/USERNAME/qdarkstyle
cd qdarkstyle
Checkout the appropriate branch
git checkout develop
Setup a virtual environment (not essential, but highly recommended).
Using virtualenv:
virtualenv ~/.venv
. ~/.venv/bin/activate
pip install -e .[develop]
Using conda (conda-forge):
conda create -n my-dev-env -c conda-forge python=3.8
conda activate my-dev-env
conda remove --force qdarkstyle # In case you have qdarkstyle installed
conda install -c conda-forge watchdog qtsass
pip install -e .[develop]
Create a new working branch. Choose any name you like
git checkout -b feature-xyz
Hands-on
For tips on working with the code, see the Code Guide.
Test, test, test
Testing is best done through
tox, which provides several targets and allows testing against multiple different Python environments:Add you and your changes
Please add a list item to CHANGES if the fix or feature is not trivial (small doc updates, typo fixes). Please add you as an author to AUTHORS.
Add files to commit
Add files that are part of your changes, remember that each commit must represent a small but functional change. Remember to add CHANGES.rst and AUTHORS.rst too. To add all files changed do:
git add .
Committing changes.
GitHub recognizes certain phrases that can be used to automatically update the issue tracker, so you can commit like this:
git commit -m "Add useful new feature that does this, close #42"

git commit -m "Fix returning problem for get_style(), fix #78"
Push changes in the branch to your forked repository on GitHub.
git push origin feature-xyz
Submit a pull request (PR).
Do it from your branch to the respective branch using the GitHub PR interface.
Wait for a maintainer to review your changes.
Logging
Inside modules, we provided logging that should be used to inform the user. Please, follow the levels below.
- debug: for debug information, a highly detailed one, directed to programmers;
- info: something important for a common user to know;
- warning: something that should not be a big problem or a decision changed;
- error: some error, but not capable of stopping program;
- critical: something that could stop the running program.
Documentation
Documentation is the key to keep all information and necessary instructions to others. We use the reStructured text format (rst) for all docs.
All new functions, classes, files, must be documented with all arguments, returns, exceptions. Without this, it should not pass the tests.
A better example is to see the current files to get the style. We are using Google Format and Sphinx for generating the docs.
Guide to QDarkStyle
Structure of the Example
Now you can use our example to work on the stylesheet. It has all possible widgets provided by Qt - common ones. Feel free to add more to them.
To simplify the structure, there are separated files in qdarkstyle/example/ui folder.
dw_buttons.ui: all types of buttons;dw_containers_no_tabs.ui: all types of containers except for tabs;dw_containers_tabs.ui: all containers tabs;dw_displays.ui: all types of displays;dw_inputs_fields.ui: all types of inputs with fields;dw_inputs_no_fields.ui: all types of inputs without fields;dw_views.ui: all types of views;dw_widgets.ui: all types of widgets;mw_menus.ui: main window with all menus and toolbars.
Note: dw stands for dock widget and mw for the main window.
The entire example is built at runtime, in qdarkstyle.example. To see more information about it, see its reference.
Feel free to modify UI files with Qt Designer.
Modifying QSS File
If you are changing the stylesheet, you will need to recompile the QRC files using qdarkstyle.utils.
This generates all resources files (images), style.qrc,
_variables.scss, style.qss, and finally style_rc.py
for each palette.
Making It Easy
To simplify this process for the developer, if you are changing many things, use the script run_ui_css_edition.py:
python scripts/run_ui_css_edition.py
This creates a loop that restarts the application, processes ui and css files.
For more information about those scripts, see their documentation.
Qt, Stylesheets, Palettes and Icons
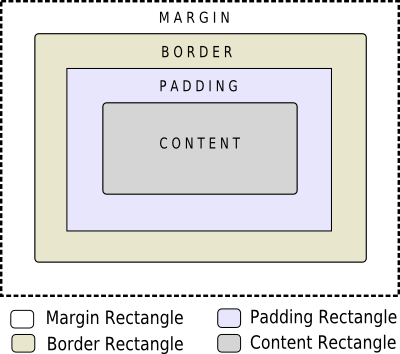
- Box model
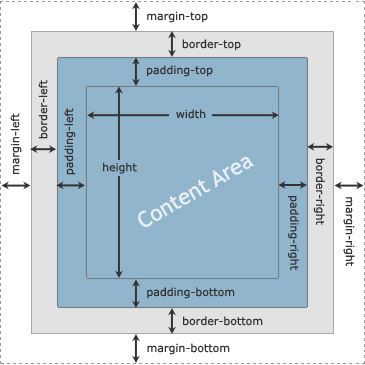
- Box model with height and width
- Customizing Widgets
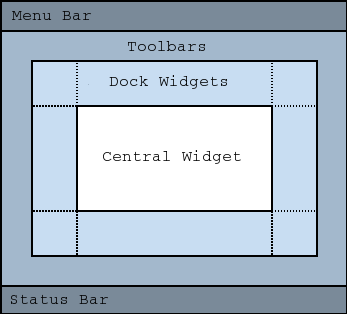
- Window structure
- QMainWindow
- References
Create good palettes with these tools. For example, on Paletton, choose three colors from grayish light (foreground), grayish dark (background) and three more colorful colors (selection). Grayish colors have a little bit of the main color, so it is nice to change it if you change the main color.
As a minimal guide to create new icons (svg) images, we list two main sources.
Main characteristics of SVG images are:
- Base size: 32px X 32px;
- Border: 2px space, except continuous lines;
- Corners and line end’s: rounded;
- Line: 2px minimum thickness. Complementary thickness using multiples of 2px;
- Spacing: 4px when needed;
- Color: #ff0000, red for all images - programmatically changed;
- Keep only structural changes in images, not colors, e.g, states hover and disabled;
- Lines and shapes should align with the grid centralized;
- Names: from basic form to specific, so they keep grouped. Ex.: arrow_left, arrow_up.
Some examples are given below for the horizontal Handle, Minimize, and checked Checkbox.
Unit Testing and Fix Preview
It is a good practice, if you are writing functions to QDarkStyle or fixing something related to those functions (not style), that you provide a test for it.
If you are fixing something about style, please, at least, provide an screenshot before and after the fix for comparison. This could be inserted in the issue tracker, as a message. Better than that, use modules provided in test folder to create a GUI test, creating a new file for it.
Check test files to more details. Tests will keep our application stable.
If You Are a Maintainer, Go Ahead to Production
Of course, until you start these steps, make sure the package have passed all tests and checkers before continuing. You must have accounts to both test and official PyPI website below along with be inserted as a maintainer in both.
Install
twinepip install twineGenerate a distribution (code package and wheel)
python setup.py sdist bdist_wheelCheck with
twine, which also tests README format for PyPItwine check dist/*Try upload in PyPI test page platform before the official
twine upload --repository-url https://test.pypi.org/legacy/ dist/*Try to install from test
pip install --no-deps --index-url https://test.pypi.org/simple/ qdarkstyleThen, remove it
pip uninstall qdarkstyle -yUpload to PyPI official page
twine upload --repository-url https://upload.pypi.org/legacy/ dist/*Try to install from official
pip install qdarkstyle
You can also use the tox environment to produce the release and upload the distribution.
tox -e release